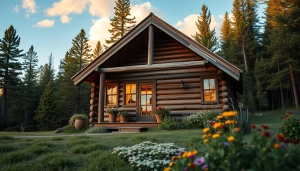
Owning a log cabin is achievable — with clear steps and realistic planning, you can turn the idea into a usable, lasting retreat. Whether you want a small summer cabin among the trees or a full-time log home, understanding how to build a log cabin gives you control over design, materials, and cost.
Learning how to build a log cabin breaks down into clear steps — choosing the right land and location, deciding between DIY or hiring pros, selecting logs and materials, and completing foundations, walls, roof, and finishes. Where you start depends on your budget, skills, and the size of the project.
This guide walks you through the essentials: DIY vs professional work, best practices for site and foundation, and practical next steps for plans and permits. Jump to the DIY vs Professional section to compare options or keep reading for a full overview.
Note: building codes and permit requirements vary by place — check local rules before you buy land or start work.
How To Build a Cabin: DIY vs Professional
Deciding whether to build a log cabin yourself or hire a professional comes down to three things: your budget, your timeline, and the skills you (or your helpers) bring to the project. Below we break down the practical pros and cons, plus real-world examples so you can choose the right path for your build log cabin project.
DIY Cabin Construction
- Cost savings: If you buy materials and supply the labor, you can often reduce the overall cost — labor can be 30–50% of a build’s budget. Many DIY builders choose pre-cut kits or smaller footprint cabins to keep costs manageable.
- Personal satisfaction and control: Doing the work yourself lets you select the logs, lumber, finishes, and floor plans and make on-the-spot design choices that reflect your vision.
- Flexibility: A DIY approach makes it easy to phase the project — start with a simple shell or a small summer cabin and add rooms, windows, or a porch later.
- Time and learning curve: Expect the project to take longer — a simple DIY cabin shell can take several weekends to months; a complete, finished log house may take a year or more depending on experience and help available.
- Specialized trades: Certain parts — foundations, electrical, plumbing, and some roof work — usually require licensed professionals for safety and code compliance. Plan to subcontract those steps if you go DIY.
- Risk of mistakes and no workmanship warranty: Errors in walls, joints, or foundations can be costly. Unlike professional builders, DIYers don’t typically get warranties on workmanship.
- Starter DIY steps (quick): 1) Choose a small plan or kit; 2) Prepare a level foundation (pier and beam or concrete pad); 3) Assemble the log walls per manufacturer instructions; 4) Install roof framing and temporary weather protection; 5) Complete windows, doors, and systems with licensed subs as required.
Hiring a Professional Builder
- Expertise and code compliance: A professional builder understands how a log cabin is built from foundation to roof and knows local building codes and permit processes — reducing the odds of expensive rework.
- Faster, coordinated timeline: Experienced crews move through framing, walls, roof, and finishes more quickly. A professional builder can schedule subs (electrical, plumbing, HVAC) to avoid long gaps between steps.
- Risk mitigation and warranties: Licensed builders often offer warranties on workmanship and manage insurance, which protects you during construction and after completion.
- Higher cost for labor: Expect to pay more overall when labor is included, but weigh that against faster completion and fewer mistakes. Ask builders for a breakdown of material vs labor cost.
- Less direct control, more guidance: You’ll trade some hands-on control for professional input on design, material selection (logs, boards, joists), and assembly methods. A good builder will include you in key decisions.
Which is right for you? If your goal is a modest, low-cost cabin and you have construction experience or willing helpers, a DIY kit or owner-builder approach can work well. If your project is larger, requires complex foundations, or must meet strict code standards, hiring a professional builder is often the safer, faster option.
Ready to explore plans or request a quote? View our starter plans for small log cabins or request a quote from an experienced builder to get a cost and timeline tailored to your land and design.
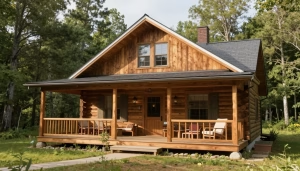
Best Practices for How to Build A Cabin In The Woods

Building a log cabin in the woods is a step-by-step project: thoughtful site selection, a correct foundation, the right species and preparation of logs and lumber, then careful assembly of floors, walls, roof, windows and doors. Below are the practical best practices — with short, actionable tips and links to deeper guidance where appropriate.
- Location and site evaluation: Choose a build site that balances views, access, and safety. Check slope, drainage, solar exposure, access roads, and proximity to trees — remove hazard trees and preserve windbreaks where possible. Do a basic site test: walk the property, note high/low spots, and identify where utilities or a well might go. For remote sites, plan how materials and crews will reach the ground and account for extra time to haul lumber and logs.
- Foundations and site prep: A level, stable foundation is the top priority. Typical options include pier-and-beam (good for sloped ground), concrete slabs (cost-effective on level sites), and full basements (adds useful space but costs more). Frost depth, soil type, and water table will guide your choice — consult local codes and an engineer for foundation sizing and footing depth. Practical tip: mark and level the building footprint, run a test hole to confirm soil, and budget extra for grading and drainage work.
- Choosing logs and lumber: Select species that fit your climate and aesthetic. Cedar and spruce are rot- and pest-resistant choices in many regions; pine is economical and attractive but may need more preservation. Buy kiln-dried lumber for interior framing and consider pre-cut log kits if you want a predictable build process. When ordering logs, confirm lengths, diameters, and taper; request sealed or pre-stained options if you want to reduce on-site finishing work.
- Walls, joints and framing: Proper notching, chinking, and fit are essential. Use proven joinery for wall stability and consider a SIP or framed interior wall for insulation efficiency. Install wall plates and ensure wall lines are level as you stack logs — small errors compound quickly. For framed sections, use treated sill plates, accurately set joists and floor framing, and protect exposed boards from ground moisture.
- Floor, joists and subfloor: Size joists for your intended loads and span; use pressure-treated sill plates where wood meets foundations. A solid subfloor provides a stable base for finishes — insulate the floor system if you plan year-round use. Check local codes for required joist spacing and floor load ratings.
- Roof system and weather protection: A robust roof protects your cabin and reduces maintenance. Match roof pitch and material to your climate (steeper roofs for heavy snow). Use underlayment, flashing at all roof-to-wall transitions, and a continuous drip line to direct water away from log walls and foundations. Temporary weather protection during construction (tarps, breathable covers) prevents log staining and rot.
- Windows, doors and finishes: Position windows for daylight and passive solar gain where appropriate. Use quality windows and doors with proper flashing and sealing to avoid water infiltration. Choose door and window sizes that fit your plans and provide easy replacement in the future. Finish logs with breathable stains or sealants — avoid trapping moisture inside the wood.
- Utilities, water and off-grid systems: For remote cabins, plan early for wells, septic, solar, and battery storage. Size solar and generator systems for expected loads and design plumbing runs to minimize freezing risk. If connecting to grid utilities, confirm availability and trenching costs for power and water lines.
- Permits, inspections and code compliance: Always check local zoning and building codes before you commit to a plan. Permit timelines vary — budget several weeks to a few months depending on your jurisdiction. Use licensed contractors for electrical, plumbing, and HVAC work where codes require it; keep records and inspection approvals as part of your project file.
Practical examples and quick rules of thumb: for a small 12′ x 16′ summer cabin, expect the shell (foundation, walls, roof) to take a few weeks for a pro crew or a few months for an owner-builder; framing lumber and logs should be ordered to the exact length and size shown in plans; joists must be sized to span your intended distance (consult span tables); and planning for a modest overhang and good flashing will protect walls and foundations for decades.
If you prefer to follow step-by-step plans, see our starter plans and framing guides for joists, floor layouts, and roof framing. For complex ground conditions or larger log house designs, consult a structural engineer early in the process to size foundations, footings, and frames correctly.
Following these best practices — site-first planning, correct foundations, careful log selection and fit, properly sized joists and floors, and weatherproof roofing and flashing — will give your cabin the best chance to be a long-lasting home or weekend retreat in the trees.
Let Our Pros Show You How A Log Cabin Is Built

At Tar River Log Homes, we design and build log cabins and log houses that perform well in real conditions. As a cabin builder serving Norch Carolina and nearby regions, our teams handle everything from site evaluation and foundations to wall systems, roof framing, windows, and finishes — so your log home is built right the first time.
Our approach blends traditional log construction with modern details: properly sized joists and floor systems, durable roofing, correctly fitted logs and chinking, and well-sealed windows and doors. We also coordinate utilities and permits so your project moves through inspections and on to completion without surprises.
We bring decades of experience to each project — with a commitment to quality craftsmanship and clear communication. Ready to move forward? Three simple next steps: 1) View our starter plans, 2) Request a custom quote tailored to your land and design, 3) Schedule a site visit so we can assess foundations, access, and material logistics. Contact us to get started; we typically respond within one business day.