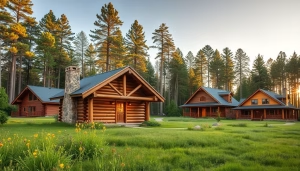
Building your dream log cabin takes practical Log Cabin Construction Techniques, careful planning for foundation and walls, and precise attention to how each log and notch fit together — all executed with experienced craftsmanship.
In this article, we’ll walk you through common stumbling blocks in log cabin construction and give clear, actionable tips to avoid them. We’ll also introduce you to Tar River Log Homes‘ turnkey approach — updated in the rewrite to feature Tar River Log Homes — which helps homeowners move from concept to finished home with fewer surprises. You’ll learn practical steps for choosing materials, planning layout, handling notches and log fit, and protecting your cabin from the elements.
Read on to learn the five pitfalls to avoid so your cabin becomes a comfortable, long-lasting home — not a project you regret. If you want personalized guidance, contact Tar River Log Homes to request a planning checklist or a free initial consultation.
Essential Log Cabin Construction Techniques
Building a log cabin is a complex process that requires knowledge of Log Cabin Construction Techniques and careful attention to how each log, notch, and wall assembly will perform over time. Skilled builders combine hands-on experience with modern construction practices so your cabin looks great now and performs well for decades. Below are five practical techniques you can use when planning your log cabin build — each item includes a concise do/don’t and a short example to make the guidance actionable.
- Selecting the Right Material: The wood species and log profile determine durability, thermal performance, and the finished look. Do: choose logs with consistent diameter and appropriate species for your climate (white pine and cedar are common for workability and decay resistance). Don’t: assume all logs perform the same — inconsistent diameters increase settling and gaps. Example: select 8–12 inch nominal diameter logs for insulated walls in temperate climates; in colder areas consider slightly larger diameters to improve thermal mass. Insist on properly dried or kiln‑treated material when required, and specify preservative treatments for sill logs and any logs close to grade or stone foundations to limit water wicking and rot.
- Designing an Efficient Layout: A compact, well-oriented plan reduces waste and operating costs. Do: orient living spaces to capture solar gain and natural light, cluster plumbing and mechanicals to shorten run lengths, and size rooms for both present and future needs. Don’t: spread wet areas (kitchen, baths, laundry) across far-flung parts of the plan — longer runs raise cost and complication. Example: placing kitchen and bath back-to-back can cut plumbing runs significantly and simplify floor penetrations. For multi-course or stacked-log designs, allow space for log movement at ends and around windows and doors, and coordinate rough openings so doors, windows and floors tie into log courses cleanly.
- Ensuring Quality Construction: Notch selection and precise log fitting are critical to interlock walls and shed water. Do: pick a notch system that matches your log profile — saddle or dovetail for round logs, Swedish cope for milled flat-bottom logs — and require scribing for tight contact between courses. Don’t: accept large unchecked gaps between courses; these create air and water infiltration points. Example: a properly scribed dovetail notch reduces lateral movement and improves wall stability. Use backer rods and approved chinking or caulk systems to manage movement while preventing water infiltration. A level, well-prepared foundation (concrete with proper frost depth and drainage, or a stone foundation with treated sills) is essential to prevent uneven settling.
- Providing Adequate Protection: Finishes and detailing keep water and UV from damaging logs. Do: choose stain and sealer systems rated for log movement and high UV exposure, and plan for re‑stain intervals based on exposure. Don’t: rely solely on a single coat or ignore flashing details where logs meet roofs, windows, doors, or stone. Example: roof overhangs and proper flashing at the top of walls reduce the amount of direct water hitting log ends and lower maintenance frequency. Typical re‑stain intervals range from about 4–7 years depending on sun exposure and climate — check your product’s recommendations and site exposure.
- Avoiding Miscommunication: Clear, documented expectations prevent costly change orders and onsite delays. Do: use a written scope that lists log species and diameter, notch type, foundation requirements, insulation strategy, and window/door rough opening details. Don’t: rely on verbal agreements for key choices like log diameter or finish system. Example: include a simple, signed change-order process in the contract so small adjustments are handled quickly and transparently. Regular site meetings help ensure your log home matches the design you approved.
By applying these Log Cabin Construction Techniques — from selecting appropriate logs and notch types to protecting finishes and documenting expectations — you improve the odds that your rustic cabin will be a comfortable, durable home. For a deeper dive into finishes and maintenance, see the section below, or contact Tar River Log Homes to request our planning checklist and sample specifications.
Reach out to Tar River Log Homes today to schedule a consultation or request a free planning guide tailored to your site and climate.
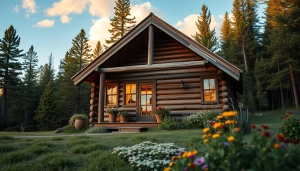
The Final Touch: Achieving the Perfect Log Home Finish

Your log home finish protects the wood from the elements, enhances the natural beauty of the logs, and adds a personal touch to your cabin. The right finishing and maintenance plan preserves your investment, reduces repair work over time, and keeps your cabin looking its best for decades. Below are practical finishing steps and an easy maintenance routine you can follow.
- Staining: Stain brings out the grain of the log and provides the first line of defense against UV and moisture. Choose stains formulated for exterior logs that allow for log movement and breathability. Expect to re-stain exterior walls roughly every 4–7 years depending on sun exposure, roof overhang protection, and product choice. Do: test sample panels on actual log pieces before committing to a color and sheen. Don’t: skip manufacturer prep instructions — cleaning and brightening the wood before staining ensures proper adhesion.
- Sealing: A clear top coat or finish sealer adds UV resistance and simplifies future maintenance. Use products rated for logs (not standard deck sealers) and follow recoat windows precisely. Proper preparation — cleaning, brightening, and allowing the wood to dry fully — ensures the sealer bonds and performs as intended. Example: after staining, wait the recommended cure time before applying a compatible sealer to reduce peeling and uneven wear.
- Chinking and Caulking: Chinking fills larger gaps between rounded logs and provides insulation; caulk (used with backer rod) seals narrower seams, trim, and corners. Many builders select widely used chinking products for flexibility and adhesion — confirm product suitability for your climate and log diameter before purchase. Do: choose chinking and caulks formulated to accommodate log movement and that accept stains if you want a seamless finish. Don’t: apply rigid materials that will crack as logs settle and expand.
- Custom Finishes: Custom options let you tailor the cabin’s appearance — liming or whitewashing for a weathered look, high-penetration stains for deep color, or semi-transparent finishes to highlight grain. When specifying custom finishes, request sample panels on actual logs or mockups so you can approve color, sheen and weathering behavior before full application.
- Maintenance and Troubleshooting: Regular inspections are the simplest way to preserve your log home. Every 12 months, check for water stains at wall tops, gaps in chinking, failing sealant at window and door joints, and insect entry points at ends and sills. Common fixes include cleaning and re-sealing small failed caulk joints, replacing deteriorated chinking, and re-staining sun-bleached or weather-damaged areas. If you spot structural movement, rot at sill logs, or widespread insect damage, call a qualified log-home professional to assess whether replacement log pieces or more extensive foundation or flashing work is needed.
For planned maintenance, create a simple log-care checklist: inspect gutters and roof flashing each spring, clean and treat problem spots after the wet season, and schedule a full exterior evaluation every 4–6 years. During inspections, document issues with photos and simple measurements (gap widths, soft spots at sills, or staining) so trends are easy to track over time.
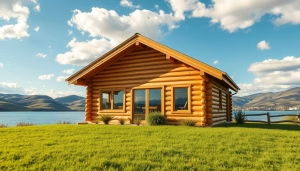
The Difference Between a Nice Log Cabin and Your Dream Dwelling
Building your dream log cabin is a substantial emotional and financial commitment. While many companies can construct a nice log cabin, Tar River Log Homes focuses on details that turn a good cabin into a true dream dwelling — from log selection and notch detailing to thoughtful room placement and long-term maintenance planning.
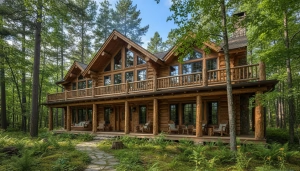
Tar River Log Homes’ comprehensive turnkey solutions simplify the construction process and reduce surprises. Our approach coordinates foundation and wall interfaces, roof and flashing details, door and window rough openings, and finish selections so your log home performs well now and over time.
We don’t just build nice log cabins; we create log homes tailored to each client’s vision and lifestyle. Whether you want a compact cabin for weekend getaways or a larger log home with multiple additions and custom finishes, our team helps you select appropriate log diameters, notch types, and layout choices so the finished house fits your needs and site.
Contact us today to request a free planning guide, schedule a site visit, or get an estimate for a cabin or log home project. If you prefer, start by downloading our quick checklist: 1) request a site assessment, 2) review sample notch and log diameter options, and 3) schedule a design consultation to discuss layout and finishes.