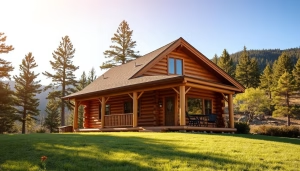
Building a log home is about more than looks. You want strength, comfort, and a fair price. At Tar River Log Homes, we believe hardworking families deserve all three. That’s why our kits use proven joinery that keeps homes sturdy without costing a fortune.
One of the strongest methods is the mortise and tenon corner. This time-tested joint locks logs together tightly. The result? A cabin that holds firm through years of weather and use.
You don’t need expensive tools or endless upgrades to get it right. With good materials and smart planning, this style works for DIY builders and pros alike.
In this guide, we’ll cover what mortise and tenon log corners are, why they matter, and how to build them to last.
What Are Mortise and Tenon Log Corners?
Mortise and tenon log corners are a tough way to join logs at the corners of your cabin or home. This method locks logs together, giving you a solid structure that lasts. It’s a special joint system that’s been around for centuries.
Let’s talk about what this joinery really means, where it came from, and the parts that make it reliable.
Defining Mortise and Tenon Joinery
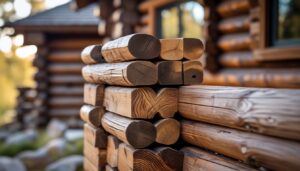
Mortise and tenon joinery is pretty simple: one piece of wood fits into a slot in another. The “tenon” is a tongue cut on the end of one log. The “mortise” is the matching hole or slot in the other log.
When you put them together, the tenon slides right into the mortise. This connection holds logs firm—no nails or screws needed. It keeps corners square and stable, even when the weather changes.
You’ll see this joint a lot in log homes because it adds strength but still lets the wood settle and shift a bit, naturally.
Origins in Log Construction
The mortise and tenon joint goes back thousands of years. Early American settlers and European builders used it in timber framing and log cabins.
It worked because it used basic tools and made a corner that could survive tough weather. Over time, this joinery became a signature for homes built to last. Even now, many log home builders use this method. Mortise and tenon corners blend old-school strength with crisp, tight fits.
Key Features of the Design
Mortise and tenon log corners have a few standout features:
- Tight fit: The tenon needs to fit perfectly in the mortise for a strong corner.
- Interlocking shape: This keeps logs from sliding or pulling apart.
- Natural shrinkage: The joint lets logs settle but stay locked.
- No metal hardware: The wood itself holds everything together, so the look stays clean.
These features make the joint both tough and pretty easy to maintain. With quality log cabin materials, you get the benefit of this tried-and-true joinery.
Benefits of Mortise and Tenon Log Corners
When you use mortise and tenon joints in your log corners, your log home gets stronger, looks better, and stands up to weather. The tight joints help keep your home safe and cozy for a long time.
Structural Stability
Mortise and tenon joints lock logs together. This gives you a solid frame that resists shifting or separating as time goes on. The tight fit spreads weight evenly across the corners, so your home won’t sag or twist as it settles.
Since the logs fit snugly, you get fewer gaps—your walls stay strong, and your cabin is safer in storms or heavy wind. This method works well for folks who want homes that last.
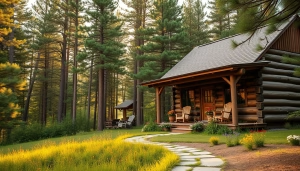
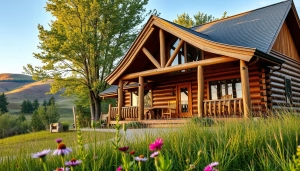
Aesthetic Appeal
Mortise and tenon corners give cabins a clean, tidy look. The joints fit inside the logs, so you don’t see big overlaps or rough edges at the corners. You get smooth, tight lines—something a lot of builders (and homeowners) really like.
You can pick different styles of mortise and tenon to match your taste. Whether you’re after a traditional vibe or something a bit more modern, this joint keeps the wood grain visible and natural, making your home feel warm and inviting.
Improved Weather Resistance
Tight joints keep rain, wind, and pests out. Mortise and tenon corners cut down on gaps and openings where water or air might sneak in. That helps keep your home warm in winter and cool in summer, without running up your energy bill.
Good weather sealing also lowers the risk of wood rot from moisture. By choosing this joint style, you’re protecting your wood and stretching your home’s life span—less hassle, fewer repairs.
Energy Efficiency of Mortise and Tenon Corners
Mortise and tenon joints make your log home more energy-efficient. Tight corners stop drafts and air leaks. That keeps heat in during winter and cool air in during summer.
The U.S. Department of Energy notes that log homes naturally insulate well, especially when corners are sealed properly. Choosing mortise and tenon corners can cut down on heating and cooling costs for years.
How Mortise and Tenon Log Corners Are Constructed
Building mortise and tenon corners takes careful tools, steady hands, and patience. You’ll need the right materials and tools, follow some clear steps, and keep an eye out for mistakes that could weaken your build.
Required Tools and Materials
To make mortise and tenon log corners, grab sharp chisels and saws. Use a drill or auger to cut precise holes for mortises. Measuring tools like a square and a tape measure help you get just the right fit.
Pick logs that are dry and straight—Eastern White Pine is a favorite for its strength and workability. You’ll also want wooden pegs or dowels to lock the joints in place. Sandpaper helps smooth rough edges after cutting.
Corner Assembly Process
Start by marking the tenon on one log end, usually a rectangle. Then, on the other log, cut the mortise—a matching hole for the tenon. The fit should be snug, but not so tight that you risk splitting the wood.
Insert the tenon into the mortise, and pin it with wooden pegs. Hammer the pegs gently to hold things firm. Use a square to keep corners at 90 degrees. Repeat for all corners until the log walls are linked up and solid.
Common Mistakes to Avoid
Cutting tenons or mortises too loose or too tight can cause real trouble. Loose joints wobble, and tight ones can split your logs. If you skip the dry fit, you might end up making fixes that are a pain later.
Dull tools make rough cuts and weak joints. Forgetting to check corners with a square? That’ll leave you with crooked walls. Take your time, double-check your measurements, and you’ll avoid most headaches.
For your cabin, using proven techniques helps you get solid corners without wasting wood or patience.
Comparing Mortise and Tenon to Other Log Corner Techniques
When you’re picking a method for your log corners, you’ve got to think about strength, ease of building, and how it’ll look. The right choice depends on your goals, your skills, and the style you want for your home.
Saddle Notch vs. Mortise and Tenon
Saddle notch corners are popular—they’re simple to cut and fit. The logs rest on each other with a curved notch, locking them in place. It’s fast and works well for folks building their own homes without fancy tools.
But saddle notches don’t give as tight a fit or as much strength as mortise and tenon. Mortise and tenon joints use precise cuts—a tenon fits into a mortise—making a very strong joint that resists twisting and shifting. Sure, you’ll spend more time on mortise and tenon corners, but you get a sturdy, long-lasting result.
Dovetail Corner Comparison
Dovetail corners step things up in strength and finish compared to saddle notches. The logs are cut into a trapezoid shape that locks together tightly and stops sideways movement. It looks sharp if you do it right.
Mortise and tenon also locks logs tightly, but it uses a hole and peg system instead of angled cuts. Dovetails shed water well, keeping the wood dry. Mortise and tenon corners can be stronger, especially if you want extra support for a bigger home. Both methods show craftsmanship, but mortise and tenon usually takes a bit more time and skill.
Butt and Pass Method Differences
Butt and pass is the simplest corner method. You just butt one log against another and spike or nail them together. It’s quick and cheap.
Still, butt and pass corners aren’t as strong or weather-tight as mortise and tenon. They can shift over time since they rely on fasteners instead of tight wood joints for a basic shed or quick cabin, butt and pass works.
But if you want a home that lasts and keeps the weather out, mortise and tenon corners are the way to go.
Best Practices for Designing Log Homes with Mortise and Tenon Corners
For strong, lasting corners, you need to pick the right logs and plan for the way wood changes over time. These details keep your log home solid and help you avoid problems later.
Selecting Appropriate Logs
Start with logs that are straight, even in diameter, and free of cracks. Eastern White Pine is popular—it’s easy to work with and tough. Make sure your logs are kiln-dried to cut down on shrinking and cracking after you build.
Look for logs with tight grain and no big knots near where you’ll cut the mortise and tenon. That keeps the joints tough. When ordering, ask for consistent lengths and shapes. It makes fitting corners easier and saves you extra work.
If you like a rustic look, you can pick logs with the bark off but natural curves left on. Just know the fit might take a bit more time. Look for logs that meet these standards at wholesale prices, so you don’t have to pick between quality and cost.
Planning for Expansion and Contraction
Wood changes size with humidity and temperature. That can loosen or crack mortise and tenon joints if you don’t plan for it. Leave a little space in your design so logs can expand and contract without stressing the corners.
Use flexible sealants or gaskets in the joints to keep out air and moisture, but still allow some movement. Think about how the roof and foundation support the walls to cut down on shifting.
It’s smart to make mortises a touch larger so the tenons can move as the logs settle. This helps you avoid splitting over time. Regular maintenance—sealing gaps, checking joints—keeps your home weather-tight and strong for the long haul.
Maintenance and Longevity of Mortise and Tenon Log Corners
Keeping mortise and tenon log corners in good shape takes some regular care. You’ve got to check for problems early and know how to fix them. That’s how your log home stays strong and lasts.
Inspection Tips
Look over your log corners at least twice a year. Check for cracks, gaps, or wood that feels soft or spongy—these can mean water damage or bugs. Pay extra attention after heavy rain or winter.
Shine a flashlight into the joints for dark spots or mold. Make sure the logs fit tightly, with no loose parts. Watch the wood’s color—any changes could mean rot is starting.
Repair and Restoration
If you spot damage, don’t wait. Fill small cracks with wood filler made for log homes. For loose tenons or mortises, tighten or swap out the wooden pegs to keep the joint solid. If you find rotten wood, cut it out and patch with a matching piece.
Treat the logs with a water-repellent stain to keep out future damage. Do this every few years so your corners don’t dry out or soak up too much water. When you need parts or advice, trusted suppliers can help you keep your home in shape.
Modern Innovations in Mortise and Tenon Log Construction
Mortise and tenon log corners these days are a cool mix of tradition and smart upgrades. You still get that solid, locked-in feel, but now it’s faster to put together and just plain cozier inside.
One big shift? Precision-cut logs. Machines do the heavy lifting, carving joints with tight tolerances, so your logs fit snug. Fewer gaps, fewer drafts—pretty straightforward.
Sealants and gaskets have gotten way better, too. They squeeze into tiny spaces at the corners, so you’re not fighting cold air or leaks every winter. It’s a small thing, but it makes a real difference.
A trusted supplier leans into these updates, offering you tough, reliable corners without making you pay through the nose. No weird tricks, just quality.
You can also pick custom sizing for your logs. Want a chunkier look? Or something sleeker? You’re in the driver’s seat, but you don’t have to fuss with complicated steps.
So, what’s new with mortise and tenon?
- Tight, machine-cut joints
- Better sealing for real energy savings
- Custom sizing for your taste
- Quicker, easier assembly
These tweaks keep the old-school strength but make the build smoother and the home warmer. If you want craftsmanship with a few modern perks, this method’s worth a look.
Common Myths About Mortise and Tenon Log Corners
People sometimes say mortise and tenon corners are too tricky for most folks. Honestly? That’s not really the case. With good materials and clear plans, you can pull it off—even if you’re not a pro. Step-by-step plans and solid logs make the build easier, with parts that fit together the way they should.
There’s also this idea that mortise and tenon corners just aren’t strong. But these joints have been holding up buildings for centuries. When you put them together right, they’re rock solid—weather, wind, whatever.
And about the price—some think it’s always more expensive. Sure, it can take a bit more time, but it doesn’t have to break the bank. Prefer a company that keeps wholesale prices on the table, so you’re not paying extra for tradition.
Special tools? Not always. Most of the time, you just need basic woodworking stuff and a little practice. Nothing too fancy.
| Myth | Fact |
| Too hard for average builders | Plans and kits make it easy |
| Not strong or durable | Time-tested, very stable |
| More expensive | Wholesale prices lower cost |
| Needs special tools | Simple tools can work fine |
Getting clear on the facts goes a long way. Mortise and tenon corners are a smart, practical choice for a log home.
Building with Mortise and Tenon Corners That Last
Mortise and tenon log corners bring strength, beauty, and energy savings to your cabin. They’ve been trusted for centuries, and with today’s tools and materials, they’re easier than ever to build right. At Tar River Log Homes, we’re here to help families create solid, affordable cabins that stand the test of time.
Ready to get started? Explore our log home kits and see how simple it can be to build a cabin with corners you can trust.
Frequently Asked Questions
Getting mortise and tenon log corners right means paying attention to size, tools, and design. If you know how to measure, where to get good materials, and what mistakes to dodge, you’ll build a better log home. Let’s dig into some common questions.
How do you determine the appropriate size for a mortise and tenon joint?
Match the joint to your log’s thickness. Usually, the tenon should be about a third as thick as the log. Take your time measuring before you cut—no one likes a wobbly corner.
Where can I find quality mortise and tenon log corners for construction?
Check out suppliers you trust, like Tar River Log Homes. They’ve got well-cut, affordable logs that fit together cleanly—no surprises or hidden fees.
What’s the best way to use a log tenon cutter for DIY projects?
Make sure your logs are good and dry, mark them up before you start, and keep your hands steady. Try a few cuts on scrap wood first. Once you get the hang of it, it’s not too bad.
Could you explain the rule of thirds in relation to mortise and tenon joinery?
The rule of thirds just means your tenon is about one-third the thickness of your log. It’s a sweet spot—enough wood to keep things strong, but not so much that the log splits.
How can I prevent my rail from twisting with a mortise and tenon joint?
Go for a snug fit and make sure the tenon is anchored well in the mortise. Sometimes a dab of glue or a wooden pin helps keep it from twisting over the years.
Are there any general guidelines for designing a mortise and tenon joint?
Try to keep joint proportions balanced—think one-third tenon depth to two-thirds mortise length. Go for clean, snug cuts. Gaps just invite moisture and trouble, so aim for a tight fit.Tar River Log Homes can help out with quality materials and a bit of friendly advice if you’re building a log home.